
Today I got an message from a friend over on Facebook saying that they couldn’t figure out how to create a photo album. From the description they left me I realized that they were confused by Facebook’s confusing interface so I decided to post an illustrated lesson here on my site. It’s really not as hard as you think!
First, look in the lower left corner of your browser’s window. See the icons down there? Those are shortcuts to some of the applications available to you on Facebook. Callout #1 is pointing to an orange icon with a person’s silhouette in it. This represents the Photos application (and will in fact alert you to that fact if you hover your mouse over it). Go ahead and click that icon….
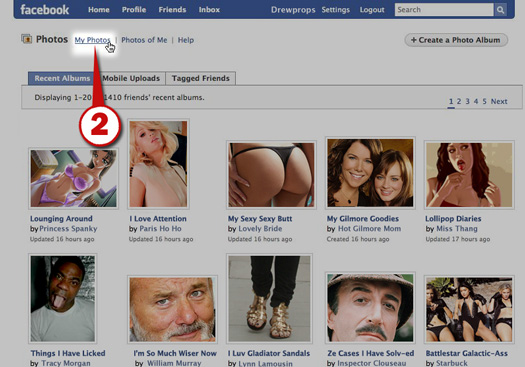
Don’t ask me why, but when you click the Photos application button it doesn’t take you to your own photo album(s), it takes you to a common area where you can see all of your friends’ photo albums. Handy if you’re just wanting to go looking around, unhandy if you’re headed to go manage your albums…. meaning that there’s one more click we need to make. Look at Callout #2 which is pointing to a link that reads “My Photos”. That’s where we need to go, so click it!
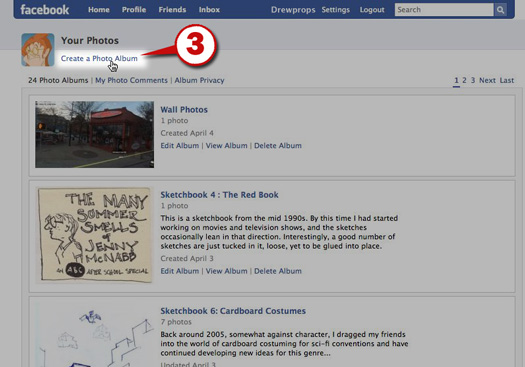
You’ve arrived at the area where your own photograph albums are kept. This is the area from where you can go and edit existing photo albums or create new ones. Making new ones is what we’re after, so look at Callout #3 which is pointing to a link which reads “Create a Photo Album”. That’s what we want, so click it!

Making a new album is easy! Just give your new album a name (“My 30th Birthday Party”, for example), give it a location if you so desire (“Airport Hilton”), and provide a brief description (people really do read captions, so make them interesting!). Next, decide who you want to be able to see these photos. If you don’t mind sharing them with the world, then pick “Everybody” from the pop-up list at the bottom of the images shown with Callout #4.
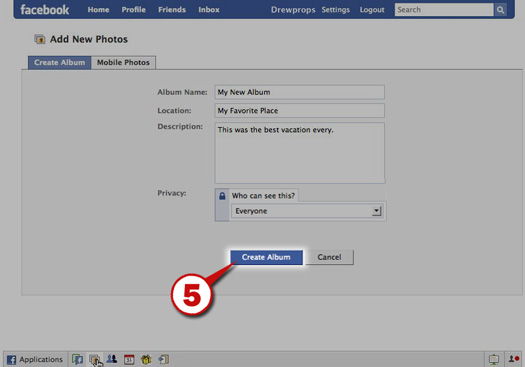
The only thing left to do is to click the button “Create Album” as indicated by Callout #5. Go ahead and click it. If you decide later that you don’t want to keep this album you can always delete it (though I’m not going to show you how to do that in this article, so you’re on your own if you post anything that might get you in trouble!! LOL)
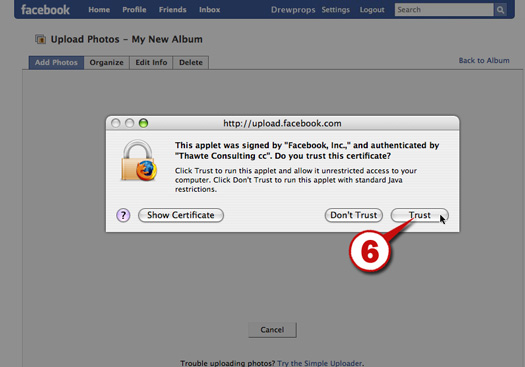
Since you’re about to open your computer to another computer you need some guarantee that Facebook is actually the entity with whom you’ll be dealing with, which is why they issue a Security Certificate to your browser. This little bit of digital handshaking is intended to establish that secure connection… and the only way you’re going to be able to post your photos, so your only real option is to click the button that Callout #6 is pointing to marked “Trust”. I don’t know about you, but I’m going to do it right now!!
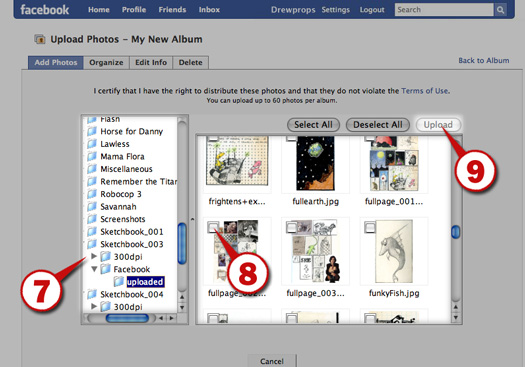
After a few moments (the connection process depends on your connection speed and your computer’s set up) you’ll be rewarded with a “window” into your hard drive. Callout #7 shows all the folders on your computer, so use it to navigate to the folder containing the photos you wish to upload to Facebook.
Once you get to the folder containing the pictures you want to upload, you’ll see small thumbnail images of each photo with an empty box on top of them. Those boxes are checkmark boxes (Callout #8 shows one example of this). All you need to do is scroll down through all the pictures in that folder and click the checkmark box for each photo you want to post to your new album on Facebook. Once you’ve put a check mark beside all the photos you wish to upload you can click the “Upload” button identified by Callout #9.
Note that you can only upload 20 photos at a time and that the Upload button will remain dimmed until you click at least one image to upload.
There are plenty more tips about uploading photos to Facebook, but I’ve run out of time for tonight! I hope that this lesson has been helpful to you. Feel free to share it with all your Facebook friends by posting a link on your Wall!