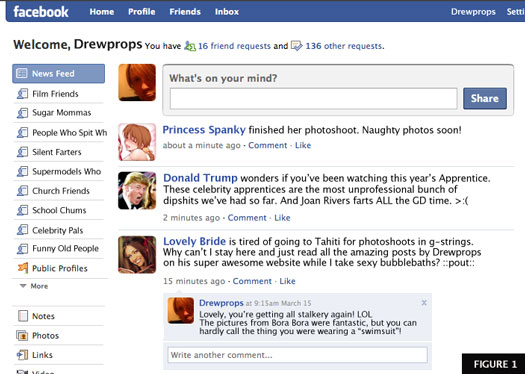
The older we get, the more resistant to change we become, however the recent (March 2009) interface update to Facebook rattled a lot of my friends, old and young alike. Some love it, some hate it, all will have to get used to it until it changes again. So until the next change arrives, I’m posting some tips to help you guys understand how to better manage your Facebook experience. Let’s start by looking at the left hand column on the home page (item #1 in Figure 2).
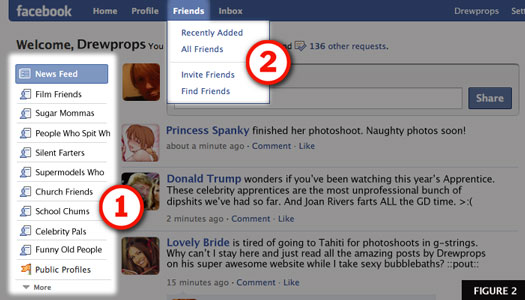
Facebook identifies this column as its “Filters”, and you’re going to appreciate the power of Filters, especially as your list of friends on Facebook grows.
By default, the Filter “News Feed” will be selected (note that in Figure 2 the item “News Feed” is highlighted in blue) and will automatically show the most recent posts by ALL of your many varied friends in the “Stream” of posts by your friends. In reality, Facebook will only show a randomly selected few posts from your list of friends.
This means that as you add more friends on Facebook you’re less likely to be shown every update from every one of your friends, and since Facebook is just a computer program it isn’t necessarily smart enough to show you updates which might interest you.
This is where Filters come into play.
For example, let’s say that I’m in a mood to catch up on the behind-the-scenes antics of all my famous friends. All I need to do is click on the Filter named “Celebrity Pals” and Presto! I’m up to date on why Jenn’s not dating that singer anymore (dude, all she wanted you to do was brush your teeth more often… you passed up on THAT action because you’re too lazy??).
Pretty cool, huh?
However, to enjoy the benefits of Filters you’re going to have to do a little work first; you’re going to have to learn how to create some Friend Lists, so let’s go make one now!
Take a look at the drop-down menu (item #2 in Figure 2) available from anywhere inside of Facebook. Note that this menu item will only be visible to you when are logged into your account.
Click on the word “Friends” at the very top, or on “All Friends” which is second down in the drop down list. This takes you to your Friends page, which is the central location for managing your friends (Lord knows nobody else can seem to manage them), take a look….
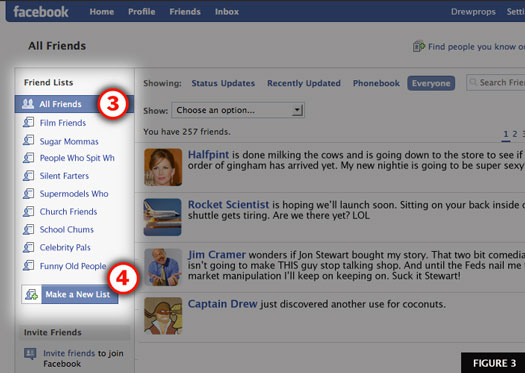
Since we elected to go to the “main” section of our Friends page you’ll notice that “All Friends” is highlighted in blue at the top of the left hand column (item #3 in Figure 3).
You can see from my example that I’ve already organized most of my friends into several Friend Lists, including: Film Friends, Sugar Mommas, People Who Spit When They Talk, Silent Farters, Supermodels Who Are Stalking Me, Church Friends, School Chums, Celebrity Pals, and Funny Old People.
But since that awesome day at spring training last week when I ran into the flight crew for the next shuttle mission I now have a lot of friends who are astronauts, so let’s make ourselves a new group called “People Smarter Than Me” (an admittedly vast list).
Underneath my existing Friend Lists you’ll see a boxy button labeled “Make a New List” (item #4 in Figure 3). Click it!
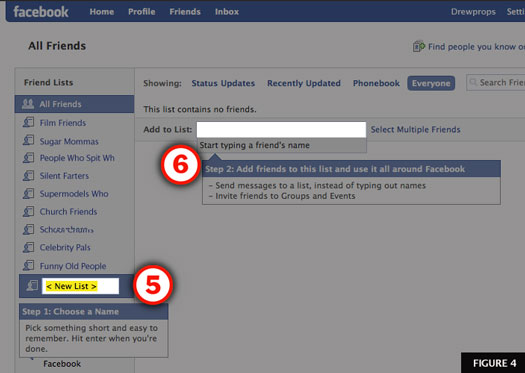
Up pops a box which states “Step 1: Choose a Name” and displays a field with “< New List >” highlighted inside (item #5 in Figure 4). Change this to read “People Smarter Than Me” (without quote marks) and hit the Return key.
Up pops another box, toward the top of the page, which states “Step 2: Add friends to this list and use it all around Facebook” (item #6 in Figure 4). Now I can add all of my friends who fit this category by typing their names into the field which follows the words “Add to List:”.
As you’ve no doubt already experienced, Facebook uses “predictive type” to narrow down your choices as you type in a name, making it fast and easy to add people to your lists.
Go ahead and make yourself some Friend Lists and when you’re finished, let’s go back to the home page and wrap this thing up….
Are you back on the home page yet? Do it!!
Aha!!
Did you notice?
Those “Filters” in the left hand column are nothing more than a way to use our “Friend Lists” to filter what we see on the home page. That’s right, they’re simply a way to sift through updates from certain subsets of our friends. Pretty handy!
But wait!!
There’s one more thing.
You can tweak the way that your homepage displays your list of Filters. You can make them all visible so that they’re handy, or you can hide them all away to have a neat and tidy homepage.
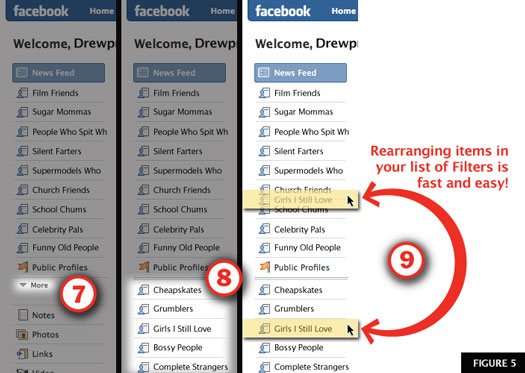
Look at the word “More” between your Friend Filters and your Application Filters (item #7 in Figure 5). When you click this you’ll see any Filters which aren’t already visible. Note that there is a double-line dividing the “seen” from the “unseen” (item #8 in Figure 5). To rearrange your Friend Filters all you have to do is to drag and drop the lists across that double line (item #9 in Figure 5). When you’re finished just click the word “Hide” and any Friend Filters you’ve set to be “below the line” will disappear. And you can get back to them quickly whenever you want.
So there you have it!
Friend Filters, not so bad now that you understand them!
Thanks for stopping by and please feel free to share this tutorial with your friends on Facebook!!! Stick around and read some of my stories!
I understand it better — and it still sucks.
* Facebook decides what friends show up in my News Feed? That’s B.S.
* Adding friends to friend lists is the most tedious process imaginable. I actually have to type each of their names individually? Are you kidding? How come every stupid zombie/garden/quiz application pops up with a check-box list of all my friends to spam, but the one time it would be useful I can’t do a batch add?
I still hate “New” New Facebook, but thanks for helping me to explain why I hate it.
how do you post a note..
I love the lists! Now I have an A list and can see what my friends are up to and skip the baloney. This transforms facebook from crap into something useful for me.
Thanks!